# Coditor
[](https://www.npmjs.com/package/coditor)
[](http://npm-stat.com/charts.html?package=coditor)
[CHANGELOG](https://github.com/davidenq/coditor/blob/master/CHANGELOG.md) to see more about recently changes.
## Important
> If you are interested in the old version, select coditor-old branch in this repo.
if there is something that you think needs to be add on coditor, open an issue to have a discussion about that.
## Introduction
Coditor is a multi-tab code editor as a component with extra features, now based on [vue.js](https://vuejs.org/) and [codemirror.js](https://codemirror.net/)
## Features
- Support a programming language for each tab (see [here](https://codemirror.net/mode/index.html) a list supported by codemirror)
- Optional, you can make web request and handle response using vue-resource
- Select a theme via setting for each tab or a single theme via a global setting for all tabs. (see [here](https://codemirror.net/theme/) a list of themes for codemirror). Coditor has its own theme called with the same name. By default is set this theme, but you can customize this theme or select other theme.
- Hack this webcomponent and customized with its own features.
- Now you can work in mode development or generate assets for production. This is possible thanks to vue-template that contain several developement environments (test, build, dev)
## Try online
[click here](https://embed.plnkr.co/cuXFBw/)
## Install
1. Install coditor
```bash
npm install coditor --save
```
2. Install dependencies and dev-dependencies
```bash
cd coditor && npm install
```
## Test in development mode
```bash
npm run dev
```
Your browser will be automatically launch into `http://localhost:8080`. By default is set javascript language, but if you need to add a new language, you need to add some line codes in ` main.js`. See how to customize coditor.
## Customize coditor for building assets
You need to customize your own preferences for coditor. This include:
- switch to another theme if you want (by default coditor theme) (optional).
- add a new themes for each tabs (optional).
- add libraries for each programing languages that will be supported to your specific requirements.
### Switch to another theme (for all tabs)
1. Import theme into `main.js` inside the `src` folder.
- all themes are inside `node_modules/codemirror/theme/` So, you must import like any other js module. For example:
```javascript
//import monokai theme
import monokai from 'codemirror/theme/monokai.css'
```
2. Change the value of theme into `config.json` inside the `src` folder to the new value (monokai).
### Add a new theme (for each tabs)
1. See literal 1 to switch to another theme. You must import each themes that you want to use.
2. You must specify for each props the theme that you want to use. (see props for coditor)
### Add libraries for each programming languages
1. Into `main.js` inside the `src` folder you must import each library that coditor should be support. See [here](https://codemirror.net/mode/index.html) all modes that support codemirror. For example:
- Example 1: Add support for c, c++ and c#
s
```javascript
import clike from 'codemirror/mode/clike/clike.js'
```
- Example 2: Add support for php
```javascript
import php from 'codemirror/mode/php/php.js'
```
2. Add in window object each mode (into `main.js` inside the `src` folder):
```javascript
internals.loadCodeMirror = (() => {
window.CodeMirror = Codemirror
window.modejs = modejs
window.clike = clike
window.php = php
// add support to a new programming language
})()
```
Now, you can specify in props what programming language will be use for each tab.
### How to use request handle with ajax using vue-resource (optional)
Into `config.json` you must specify a type request (get, post, etc) and url.
For example:
```json
{
"theme": "coditor",
"lineNumbers": true,
"http": {
"url": "",
"type": "",
"options": {
"emulateHTTP": true,
"emulateJSON": true
}
},
"init": {
"name": "tab init",
"mode": "javascript",
"value": "function helloWorld () {\n console.log('Coditor');\n}"
}
}
```
Or via props you must speficy a type request (get, post, etc) and url.
For example:
```javscript
coditor.http = {
url: 'http://localhost:8080/post',
type: 'get'
}
```
There are others settings for vue-resource (see [here](https://github.com/pagekit/vue-resource/tree/master/docs) for more settings and type of request)
> In development mode you can test this option. When you click get the current editor information button you will be receive a response from the server and it will be show in console. (only for methods get and post)
## Build assets
Use `npm run build` to build the project minified version. Inside the `dist` folder will you have minified assets.
## How to use coditor in your app
If you already built assets, continue with the tutorial. If you haven't already done so, please see how to customize coditor.
1. Into your html page of their app should add the coditor tag on the html body and assets that was generated.
```html
<!DOCTYPE html>
<html>
<head>
<meta charset="utf-8">
<title>coditor</title>
<link href=/static/css/app.bcbf3089697ef644d789a2bd1d4034b1.css rel=stylesheet>
</head>
<body>
<coditor></coditor>
<script type=text/javascript src=/static/js/manifest.dc23b23c8948b8e3b634.js></script>
<script type=text/javascript src=/static/js/vendor.23969caa477a638a5a0a.js></script>
<script type=text/javascript src=/static/js/app.9219903ee545d47d5660.js></script>
</body>
```
Now, you can execute your application and by default you will see only one tab with the options that you configured into `config.json` or via props.
### minimum props
|type|key|value|
|----|---|----|
|[string]|name|a name whatever|
|[string]|mode|language programming|
If you want init with a piece of code, you must specify a third `key:value` in settings:
|type|key|value|
|----|---|----|
|string|value|piece of code|
See below the basic and advanced settings.
### Basic setting for each tab
To a basic configuration for each tab, you must specify minimum two values. (name and mode)
- Create a script tag and into window object add new javascript object called coditor and on coditor object add a new value type array that contain settings for each tab. Example:
```javascript
<script>
window.coditor = {}
coditor.cfg = [{
name: 'Tab 1',
mode: 'javascript'
}, {
name: 'Tab 2',
mode: 'text/x-java'
}];
</script>
```
### Advanced setting for each tab
To have more control over the each tab, see [here](https://codemirror.net/doc/manual.html) all configuration options for codemirror.
(By default, theme is set with coditor theme and lineNumbers is true, but if you want, you can change this values)
Example advanced setting:
```javascript
<script>
window.coditor = {}
coditor.cfg = [{
name: 'Tab 1',
value: 'function holaMundo () {\n var name = "Coditor";\n console.log(name);\n console.log("at has been replaced");\n}',
mode: 'text/javascript',
lineNumbers: false
}, {
name: 'Tab 2',
mode: 'text/x-java',
theme: 'monokai'
}];
</script>
```
## `window.coditor` object
`window.coditor` object contain two values:
- cfg: [array] contain props
- value: [object] contain data about the information that was captured when clicked button (get the current editor information)
> whether you specified http config or not, also will be have the value information that was captured when clicked button get the current editor information.
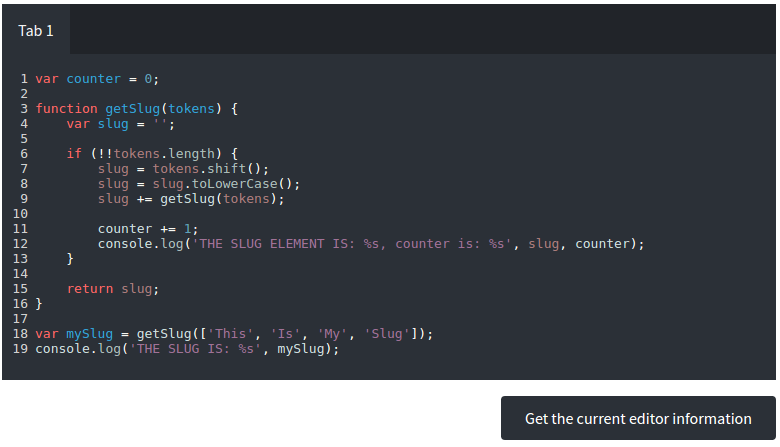
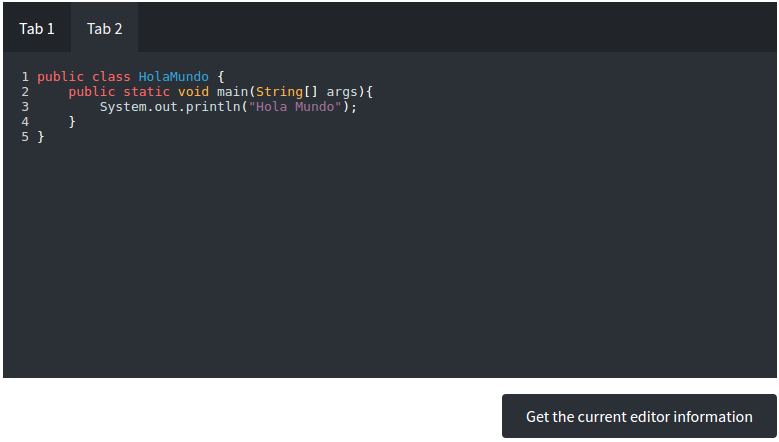
## Screenshots

## Contributing
You are welcome to contribute to this repo with anything you think is useful. fixes are more than welcome.
## Support
If you need help using coditor, or have found a bug, please create an issue on the [GitHub repo](https://github.com/davidenq/coditor/issues)
## License
MIT Licence


